사내 소수 인원이 사용할 SW를 배포했더니 아래와 같은 문제가 발생하였다.


배포 매니페스트 서명에 사용된 인증서를 신뢰할 수 없으므로 이 응용 프로그램에서 사용자 지정 기능이 작동하지 않습니다.

.....

System.Security.SecurityException이 발생


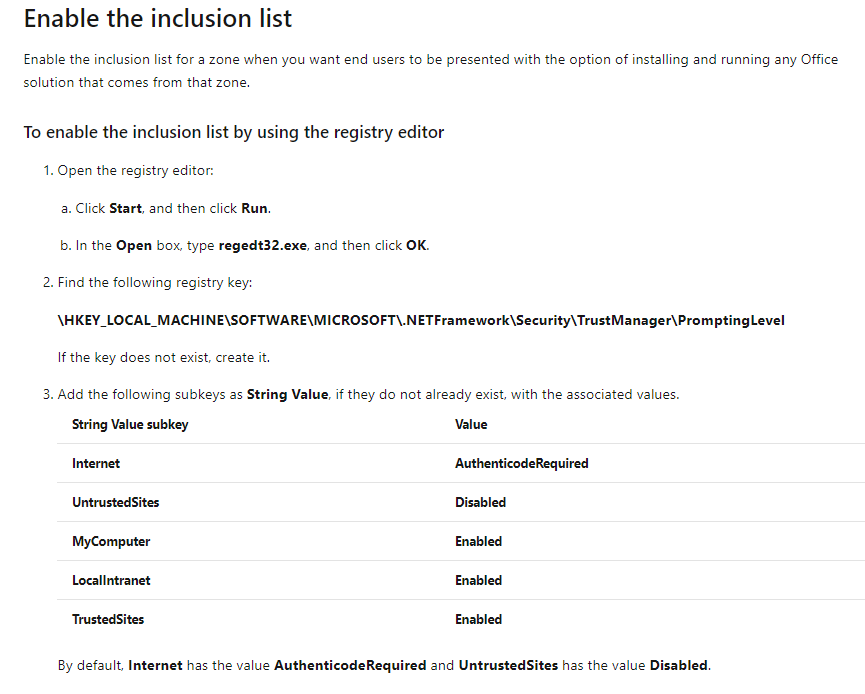
사용자의 레지스트리를 확인해서 아래와 같이 수정한다.


https://docs.microsoft.com/en-us/visualstudio/vsto/how-to-configure-inclusion-list-security?redirectedfrom=MSDN&view=vs-2019


How to: Configure inclusion list security - Visual Studio

How to: Configure inclusion list security In this article --> If you have Administrator permissions, you can configure the ClickOnce trust prompt to control whether end users are given the option of installing Office solutions by saving a trust decision to

docs.microsoft.com


'VisualStudio > 설치 프로젝트' 카테고리의 다른 글

VS2013 설치 프로젝트  (0) 2015.06.05
VS2010 설치 프로젝트 작성하기  (0) 2012.12.27

2019년 8월 13일 안양 찬스바이크에서 2019 메리다 스컬트라 4000을 구매하였습니다.


사이즈는 XS입니다.


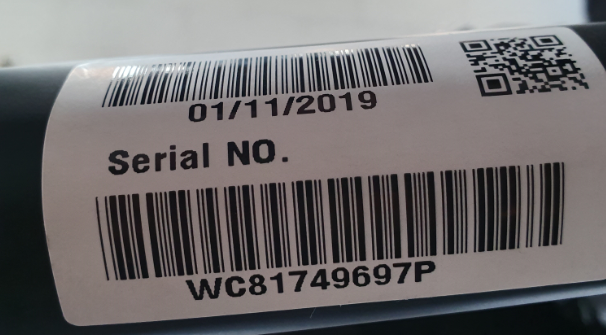
차대번호 : WC81749697P


로드바이크는 처음인데 정말 가볍네요.


집에 올때 잠깐 탔는데 핸들 조작이 어색하네요 ㅎㅎ;;


엄청 빨라서 놀랐습니다.


오디바이크 사이트가서 차량 등록해야겠네요 ㅎㅎ


sample.txt


훈스닷넷에 PictureBox위에 1cm 간격으로 눈금을 그리고 싶어하는 질문이 있어서


데모 프로젝트를 작성해보았습니다.


코드는 아래와 같습니다.


public partial class Form1 : Form

{

    /// <summary>

    /// 1pixel에 해당하는 센치

    /// </summary>

    const float OnePixelCentimetre = 37.79f;

    /// <summary>

    /// 수직라인 길이

    /// </summary>

    const int VerticalLineHeight = 50;

    /// <summary>

    /// 그리드 라인 색상

    /// </summary>

    readonly Pen gridLineColor;


    public Form1()

    {

        InitializeComponent();

        this.pictureBox1.Image = Image.FromFile("./Chrysanthemum.jpg");


        this.pictureBox1.Paint += PictureBox1_PaintEventHandler;

        this.SizeChanged += Form1_SizeChangedEventHandler;

        this.gridLineColor = Pens.Yellow;

    }


    /// <summary>

    /// 폼의 사이즈 변경 이벤트 처리기

    /// </summary>

    /// <param name="sender"></param>

    /// <param name="e"></param>

    private void Form1_SizeChangedEventHandler(object sender, EventArgs e)

    {

        this.pictureBox1.Invalidate();

    }


    /// <summary>

    /// PictureBox Paint 이벤트 처리기

    /// </summary>

    /// <param name="sender"></param>

    /// <param name="e"></param>

    private void PictureBox1_PaintEventHandler(object sender, PaintEventArgs e)

    {

        PictureBox pb = (PictureBox)sender;

        Graphics g = e.Graphics;


        //Picturebox의 중앙 위치

        float centerYPosition = pb.Height / 2.0f;


        //수평 라인 그리기

        g.DrawLine(gridLineColor, 0f, centerYPosition, pb.Width, centerYPosition);


        //현재 Picturbox에서 1cm 개수

        double cmStep = pb.Width / OnePixelCentimetre;


        //세로 라인의 절반

        int verticalLineHeightHalf = VerticalLineHeight / 2;


        //수직 라인 그리기

        for (float i = 0; i < pb.Width; i += OnePixelCentimetre)

        {

            PointF beginPoint = new PointF(i, centerYPosition - verticalLineHeightHalf);

            PointF endPoint = new PointF(i, centerYPosition + verticalLineHeightHalf);

            g.DrawLine(gridLineColor, beginPoint, endPoint);

        }

    }

}


프로젝트(vs2015 작성) : HowToDrawOnPicturebox.zip


개발 중인 프로젝트에서 상용 컴퍼넌트를 이용하다보니 제작한 라이브러리 포함하여 dll이 30개 정도 되었다.


고객님께서는 dll이 너무 많아 복잡하다며 실행 파일 한개만을 원하셨다.


제프리 리쳐 형님과 같이 동적으로 어셈블리를 로드할까 했는데....좀 더 검색해보았다.


AppDomain.CurrentDomain.AssemblyResolve += (sender, args) => {

    String resourceName = AssemblyLoadingAndReflection. +

        new AssemblyName(args.Name).Name + .dll;

    using (var stream = Assembly.GetExecutingAssembly().GetManifestResourceStream(resourceName))

    {

        Byte[] assemblyData = new Byte[stream.Length];

        stream.Read(assemblyData, 0, assemblyData.Length);

        return Assembly.Load(assemblyData);

    }

}; 

참조 : https://blogs.msdn.microsoft.com/microsoft_press/2010/02/03/jeffrey-richter-excerpt-2-from-clr-via-c-third-edition/


결국 Costumra.Fody 를 찾게 되었다.


자동으로 exe 안에 라이브러리를 넣어준다. 압축까지 지원해준다.


Nuget을 통하여 설치하면 "FodyWeavers.xml" 파일이 생성된다.


해당 xml 파일을 이용해 정교한 설정이 가능하다. (압축여부, Debug심볼첨부여부 등등...)


https://github.com/Fody/Costura


압축하였을 때는 .zip 확장자로 exe 파일에 삽입되어있다.


[압축하지 않은 상태]


[압축한 상태]

'.Net > C#' 카테고리의 다른 글

C# 리플렉션을 이용한 Delegate 넘기기  (0) 2016.05.11
C# Undo Redo 기능 구현하기  (3) 2015.10.20
C# 원문자 구하기  (0) 2015.10.05
SerialPort Read Blocking 시키기  (0) 2015.08.05
문자열 비교 테스트 (대소문자 무시)  (0) 2015.07.02

A.exe에서 B.dll을 컴파일시 참조하지 않고  동적으로 참조할 때,


B.dll에 있는 특정 클래스 메서드의 파라미터(Delegate)를 넘길때 방법입니다. 


리플렉션을 이용해서 대리자 개체를 생성 후 Invoke 파라미터에 넘겨주었습니다.


A.exe


using System;

using System.Collections.Generic;

using System.ComponentModel;

using System.Data;

using System.Drawing;

using System.Linq;

using System.Reflection;

using System.Text;

using System.Threading.Tasks;

using System.Windows.Forms;


namespace DelegateReflaction

{

    public partial class Form1 : Form

    {

        public Form1()

        {

            InitializeComponent();

            InvokeTest();

        }


        private void InvokeTest()

        {

            string dllFilePath = @"D:\Work\Project\Test\DelegateReflaction\TestLibrary\bin\Debug\TestLibrary.dll";

            Assembly assembly = Assembly.LoadFile(dllFilePath);


            Type formType = assembly.GetType("TestLibrary.ChiForm");


            //Child 델리게이트 타입 가져오기

            Type deleType = assembly.GetTypes().Single(a => a.Name == "CallbackDelegate");


            //현재 클래스의 Callback 메서드 정보 가져오기

            MethodInfo callBackMethodInfo = this.GetType().GetMethod("Callback", BindingFlags.NonPublic | BindingFlags.Instance, null, new Type[] { typeof(string) }, null);


            //Child CallbackDelegate Delegate를 이용해서 Deleagte 생성

            Delegate callbackMethod = Delegate.CreateDelegate(deleType, this, callBackMethodInfo);


            //Child 폼 생성

            Form form = Activator.CreateInstance(formType) as Form;


            //Child DoWork 메서드 가져오기

            MethodInfo doworkMethodInfo = formType.GetMethod("DoWork");


            //파라미터 생성

            object[] parameters = new object[2];

            parameters[0] = "test~";

            parameters[1] = callbackMethod;


            //Child Dowork 메서드 호출

            doworkMethodInfo.Invoke(form, parameters);


            form.Show();

        }


        void Callback(string msg)

        {

            MessageBox.Show(msg);

        }

    }

}


B.dll


using System;

using System.Collections.Generic;

using System.Linq;

using System.Text;

using System.Threading.Tasks;

using System.Windows.Forms;


namespace TestLibrary

{

    public class ChiForm : Form

    {

        public delegate void CallbackDelegate(string status);


        public ChiForm()

        {

            InitializeComponent();

        }


        public void DoWork(string param, CallbackDelegate callback)

        {

            callback("status");

        }


        private void InitializeComponent()

        {

            this.SuspendLayout();

            //

            // ChiForm

            //

            this.ClientSize = new System.Drawing.Size(284, 262);

            this.Name = "ChiForm";

            this.Text = "ChildForm";

            this.ResumeLayout(false);


        }

    }

} 


프로젝트 (vs2015 작성) :  DelegateReflaction.zip


'.Net > C#' 카테고리의 다른 글

C# 실행파일 안에 DLL 넣기  (0) 2016.05.16
C# Undo Redo 기능 구현하기  (3) 2015.10.20
C# 원문자 구하기  (0) 2015.10.05
SerialPort Read Blocking 시키기  (0) 2015.08.05
문자열 비교 테스트 (대소문자 무시)  (0) 2015.07.02

Undo 기능에 쓰일 스택과 Redo 기능에 쓰일 스택을 이용해서 Undo, Redo 기능을 구현해보았다.


UndoRedoHistory 클래스에서는 특정 타입의 상태를 저장할 수 있고, Undo, Redo를 통해 상태 값을 가져온다.


/// <summary>

    /// Undo Redo 내역을 기록하는 클래스

    /// </summary>

    /// <typeparam name="T">기록할 타입</typeparam>

    public class UndoRedoHistory<T>

    {

        const int DefaultUndoCount = 10;

        RimitedStack<T> undoStack;

        RimitedStack<T> redoStack;


        /// <summary>

        /// Undo 기능을 사용할 수 있는지 여부를 가져온다.

        /// </summary>

        public bool IsCanUndo

        {

            get

            {

                //맨 초기 상태때문에 1보다 커야한다.

                return this.undoStack.Count > 1;

            }

        }


        /// <summary>

        /// Redo 기능을 사용할 수 있는지 여부를 가져온다.

        /// </summary>

        public bool IsCanRedo

        {

            get { return this.redoStack.Count > 0; }

        }


        public UndoRedoHistory()

            :this(DefaultUndoCount)

        {


        }


        public UndoRedoHistory(int defaultUndoCount)

        {

            undoStack = new RimitedStack<T>(defaultUndoCount);

            redoStack = new RimitedStack<T>(defaultUndoCount);

        }


        /// <summary>

        /// 이전 상태를 가져온다.

        /// </summary>

        /// <returns></returns>

        public T Undo()

        {

            T state = this.undoStack.Pop();

            this.redoStack.Push(state);

            return this.undoStack.Peek();

        }


        /// <summary>

        /// 이후 상태를 가져온다.

        /// </summary>

        /// <returns></returns>

        public T Redo()

        {

            T state = this.redoStack.Pop();

            this.undoStack.Push(state);

            return state;

        }


        /// <summary>

        /// 상태를 추가한다.

        /// </summary>

        /// <param name="state"></param>

        public void AddState(T state)

        {

            this.undoStack.Push(state);

            this.redoStack.Clear();

        }


        /// <summary>

        /// 상태를 모두 제거한다.

        /// </summary>

        internal void Clear()

        {

            this.undoStack.Clear();

            this.redoStack.Clear();

        }

    }


ReimetedStack은 개수 제한이 있는 스택이다.


개수 제한이 걸렸을 때, 맨 처음 삽입한 상태를 제거해야하므로, 내부 자료구조는 사실 Stack이 아닌 List로 구현해놓았다.


/// <summary>

/// 개수 제한이 있는 스택 클래스

/// </summary>

internal class LimitedStack<T>

{

    List<T> list = new List<T>();

    readonly int capacity;

    /// <summary>

    /// 개수를 가져온다.

    /// </summary>

    public int Count

    {

        get { return this.list.Count; }

    }


    /// <summary>

    /// 생성자

    /// </summary>

    /// <param name="capacity"></param>

    public LimitedStack(int capacity)

    {

        this.capacity = capacity;

    }


    /// <summary>

    /// 맨위의 개체를 반환하고 제거한다.

    /// </summary>

    /// <returns></returns>

    internal T Pop()

    {

        T t = this.list[0];

        this.list.RemoveAt(0);

        return t;

    }


    /// <summary>

    /// 개체를 맨위에 삽입한다.

    /// </summary>

    /// <param name="state"></param>

    internal void Push(T state)

    {

        this.list.Insert(0, state);

        if (this.list.Count > capacity)

        {

            this.list.RemoveAt(this.list.Count - 1);

        }

    }


    /// <summary>

    /// 맨위의 개체를 제거하지 않고 반환한다.

    /// </summary>

    /// <returns></returns>

    internal T Peek()

    {

        return this.list[0];

    }


    /// <summary>

    /// 개체를 모두 제거한다.

    /// </summary>

    internal void Clear()

    {

        this.list.Clear();

    }

}


아래는 텍스트 박스의 내용을 저장하는 기능을 구현한 데모 코드이다.


public partial class Form1 : Form

{

UndoRedoHistory<string> undoRedoHistory = new UndoRedoHistory<string>(10);


public Form1()

{

    InitializeComponent();

    SaveCurrentState();

    this.textBox1.KeyDown += TextBox1_KeyDown;

}


private void TextBox1_KeyDown(object sender, KeyEventArgs e)

{

    Keys keyData = e.KeyData;

    if ((keyData & Keys.Control) == Keys.Control)

    {

        if ((keyData & Keys.Z) == Keys.Z)

        {

            this.Undo();

        }

        else if ((keyData & Keys.Y) == Keys.Y)

        {

            this.Redo();

        }

    }

}


private void Redo()

{

    if (this.undoRedoHistory.IsCanRedo)

    {

        this.textBox1.Text = this.undoRedoHistory.Redo();

    }

}


private void Undo()

{

    if (this.undoRedoHistory.IsCanUndo)

    {

        this.textBox1.Text = this.undoRedoHistory.Undo();

    }

}


private void btnSave_Click(object sender, EventArgs e)

{

    this.SaveCurrentState();

}


/// <summary>

/// 현재 상태를 저장한다.

/// </summary>

private void SaveCurrentState()

{

    undoRedoHistory.AddState(this.textBox1.Text);

}


샘플 프로젝트 :KDYFramework.UndoRedo.zip


'.Net > C#' 카테고리의 다른 글

C# 실행파일 안에 DLL 넣기  (0) 2016.05.16
C# 리플렉션을 이용한 Delegate 넘기기  (0) 2016.05.11
C# 원문자 구하기  (0) 2015.10.05
SerialPort Read Blocking 시키기  (0) 2015.08.05
문자열 비교 테스트 (대소문자 무시)  (0) 2015.07.02


위와 같이 PictureBox의 이미지를 투명하게 만드는 코드이다.


1. 불러올 파일의 경로의 Image 개체를 생성 


2. ChangeOpacity 메서드를 통해 이미지의 알파값을 변경하여 새로운 비트맵 개체 생성


3. 생성한 비트맵 개체를 PictureBox Image 속성으로 설정


4. 생성한 Image 개체 제거


public partial class Form1 : Form

{

    public Form1()

    {

        InitializeComponent();

    }


    private void btnLoad_Click(object sender, EventArgs e)

    {

        OpenFileDialog of = new OpenFileDialog();


        if (of.ShowDialog() == DialogResult.OK)

        {

            try

            {

                this.SetImage(of.FileName);

            }

            catch (Exception ex)

            {

                MessageBox.Show(ex.Message);

            }

        }

    }


    private void SetImage(string fileName)

    {

        try

        {

            Image img = Image.FromFile(fileName);

            this.pictureBox1.Image = ChangeOpacity(img, 0.5f);

            img.Dispose();

        }

        catch (Exception ex)

        {

            throw ex;

        }

    }


    /// <summary>

    /// 해당 이미지의 투명도를 변경한다.

    /// </summary>

    /// <param name="img"></param>

    /// <param name="opacityvalue"></param>

    /// <returns></returns>

    public Bitmap ChangeOpacity(Image img, float opacityvalue)

    {

        Bitmap bmp = new Bitmap(img.Width, img.Height);

        Graphics graphics = Graphics.FromImage(bmp);

        ColorMatrix colormatrix = new ColorMatrix();

        colormatrix.Matrix33 = opacityvalue;

        ImageAttributes imgAttribute = new ImageAttributes();

        imgAttribute.SetColorMatrix(colormatrix, ColorMatrixFlag.Default, ColorAdjustType.Bitmap);

        graphics.DrawImage(img, new Rectangle(0, 0, bmp.Width, bmp.Height), 0, 0, img.Width, img.Height, GraphicsUnit.Pixel, imgAttribute);

        graphics.Dispose();

        return bmp;

    }

}


vs2015 프로젝트 :  PictureBox투명도.zip


출처 : https://raviranjankr.wordpress.com/2011/05/25/change-opacity-of-image-in-c/


답변 :


t's actually not a bug, but may seem such.

In stacked or segmented mode, vertical zooming currently works as follows:
axis.Maximum and Minimum are multiplied or divided (depending on in/out zoom) by ViewXY.ZoomPanOptions.ZoomFactor value. That happens when zooming with Ctrl + left or right mouse button click. Wheel is related to factor this as well.

As your Y range is not symmetrical to 0 level, the new zoomed scale is not suitable for your data. And in your code you have enabled series.LimitYToStackSegment, so it shows up very clearly and ugly.

There's a way to override zooming with custom logic like this, by using BeforeZooming event handler:

m_chart.ViewXY.BeforeZooming += ViewXY_BeforeZooming;


//Make symmetrical zooming around old Y range center point.
void ViewXY_BeforeZooming(System.Collections.Generic.List<RangeChangeInfo> xRanges,
System.Collections.Generic.List<RangeChangeInfo> yRanges, bool byWheel, ref bool cancel)
{
m_chart.BeginUpdate();
cancel = true;
foreach(RangeChangeInfo rci in yRanges)
{
double yMid = (rci.OldMin + rci.OldMax) / 2.0;
double newYRange = rci.NewMax - rci.NewMin;

rci.Axis.SetRange(yMid-newYRange/2.0, yMid + newYRange/2.0);
}
m_chart.EndUpdate();
}


Maybe we should change the built-in zooming to use this kind of "symmetrical-to-Y-range-mid-point" instead of the current approach?

+ Recent posts